We Need to Talk About the Glitter Tears Nail Art 'Trend'

I’ve seen a few publications writing about ‘Glitter Tears Nail Art’ as if it were a new trend making the rounds. I just wanted to go on record to set things straight – nail artists were doing it long before Glitter Tears were a thing. No shade… just giving credit where it’s due!

It’s really just your classic glitter gradient on a blank base i.e. no base colour, just clear polish. Calling it a trend is a little… reductive. It’s one of the oldest tricks in the book and will always be in style.

This particular take on the look is inspired by Hannah Rox it who has the tutorial up on her YouTube channel.

Now I know what you’re thinking – and yeah, of course it takes a really long time! I had to place every piece of glitter individually. But that’s half the fun of it if you’re an anally retentive perfectionist like myself, right?

In all, the whole hand took less than 45 minutes and I was distracted by Gilmore Girls on in the background so I think I could do it in 25 if I was concentrating. There is an easier way to get the look – read on for more.

How to do the Nail Art

1. Apply your usual base coat.
2. Find a clear polish or top coat that isn’t a quick dry polish – the longer it stays wet, the longer you have to attach the glitter.
3. Using something pointy (I use toothpicks), pick up your pieces of glitter one at a time and start at the tip of your nail. Place them in a falling pattern – with more coverage right at the tip, using less as you get close to the cuticle.
4. If the clear coat on your nails dries before you finish, just apply another or dab on the spots where you need it most.
5. Finish with a couple of layers of top coat. I’d recommend using quite a thick top coat to really smooth over the glitter chunks.

The Hack

If you want to get the look in half the time, all you need is your favourite glitter polish and a makeup wedge.
1. Apply a clear base coat.
2. Paint a little glitter polish on to the edge of your sponge and dab it straight on to the tip of your nail.
3. Keep dabbing gently (but never drag/swipe) and take it halfway down your nail to create the fade.
4. Finish off with a few layer of top coat to smooth things over.

A Few Tips

Practice on falsies first and try to have patience. Practice makes perfect!
If you’re going to use the sponge hack, use a fine glitter
HAVE FUN! Have you seen the glitter options flooding stores lately? The possibilities are literally endless!

Products Used

OPI Nail Envy base coat
Hexagonal Holographic glitter / glequins from Born Pretty Store (Option #1)
NYC Classy Glassy Top Coat (Slow-ish Drying)
Seche Vite Top Coat (Fast Dry)


The Lazy Girl's Guide to Easy Nail Care

Nails can get overlooked in favour of hair and skin when it comes to pamper time

But pretty nails don’t take much work if you know the right secrets. In 7 years of at-home manicures, I’ve learned more than my fair share so I’m going to bestow them upon you!

Here are 4 minimally time consuming and easy nail care hacks to improve the appearance and health of your nails without even trying very hard.

Upgrade Your Nail File (-50%)

Get yourself a crystal nail file and you’ll find that shaping your nails takes half the time it would with the flimsy cardboard one that came inside a manicure kit someone got you for Christmas 2 years ago (I’ve been there, girl).
The glass nail files that you pick up in the drugstore should have a fine ‘grit’ which means they’re gentle on natural nails. You can tell if a file has a fine or coarse grit by just running your finger along it. If it feels ‘sandy’, it’s probably too coarse to use on the tips of your nails and can do more harm than good; so steer clear.

Lazy Girl’s Protip: You can run a crystal nail file through the dishwasher to clean it

I recommend: Mylee Crystal Nail File

Using Base Coat

Always Use a Base Coat (2 minutes)

Using a good base coat before you apply your colour will make your mani last longer and strengthen your nails while you go about your day. Win win! You only need a very thin coat and they tend to dry very quickly. By the time you’ve finished the 10th nail, the first one is dry and ready for your colour.

I recommend: OPI Nail Envy Original (Read my full review)

(While we’re here, top coat isn’t optional either. Treat yourself to some Seche Vite and you’ll wonder how you ever deprived yourself of the joy of a shiny, rock hard manicure!)

Nail Care at Bedtime

Moisturise Your Cuticles at Bedtime (3 minutes)

Most of us have some sort of nighttime routine that we can’t sleep without. Here’s how mine goes…

  • Moisturise face
  • Apply lip balm
  • Tie up hair
  • Plug in phone
  • Moisturise cuticles

I keep a few choice products on my nightstand so I can do it when I’m already snuggled in bed. I don’t like anything too greasy that’s going to make a mess of my bedsheets, so I go for Nail Butter or Sally Hansen Moisture Rehab.  Nail Butter takes a while to soak in but the Sally Hansen absorbs really quickly.

Generously apply your product to the cuticle area and massage it in. Repeat nightly until it becomes ritual!

I recommend: Nail Butter or Sally Hansen Moisture Rehab
UPDATE: So many of you are interested in Nail Butter but not so sure about the price so I got in touch with the company and now you can use code BUTTERSAURUS for 20% off at nailbutter.com/shop (valid until February 19th 2017). This isn’t an affiliate link and I don’t profit from any sales of the product. It’s just a great product!

Cuticle Remover

Crush Those Cuticles! (6-10 minutes)

Most cuticle removers clock in at 1-2 minutes of waiting time. Sally Hansen’s Instant Cuticle Remover only needs 15 seconds to melt away any unwanted cuticle growth. You’ll also need a good tool to push them back and a brush to wash them away. Once you’ve found your flow and practised a few times, you could even get this whole routine down to less than 10 minutes.

It’s got to be: Sally Hansen Instant Cuticle Remover and a Stainless Steel Cuticle Pusher

6 Fresh AF Colour Combos for Your Summer Gradient Nail Art | The Nailasaurus


There’s a perfect time and place for gradient nails so bright and juicy that they’re just begging for attention. The time is summer and the place is everywhere! Here are 6 colour combos that’ll get you started and don’t forget to scroll to the end for a gradient tutorial!

1. Peach Sorbet

You’ll need: One pastel purple and a perfect peach
I used: OPI I’m Gown For Anything & Seventeen Bright Peach


2. Cherry Wine

You’ll need: One juicy pink/red and a deep berry red
I used: Kriston 35 & Sally Hansen Oh My Magenta (from the Color Therapy Range)


3. High Contrast

You’ll need: One turquoise and a bright pink
I used: Models Own Island Hop & OPI Suzi Says Feng Shui


4. Cool and Creamy

You’ll need: One pastel blue and a cool plum
I used: OPI The I’s Have It & Morgan Taylor Figure 8’s and Heartbreaks


5. Fruit Salad

You’ll need: One buttery lemon and a pink that pops
I used:Revlon Buttercup & Sally Hansen Mauve Mantra


Summer Gradient Nails

6. Lots of Limes

You’ll need: One fresh mint, one lime green and one chartreuse
I used: Kriston 10, Faby Springtime Art and Avon Citronized


For Questions About My Ginger Hair | The Nailasaurus

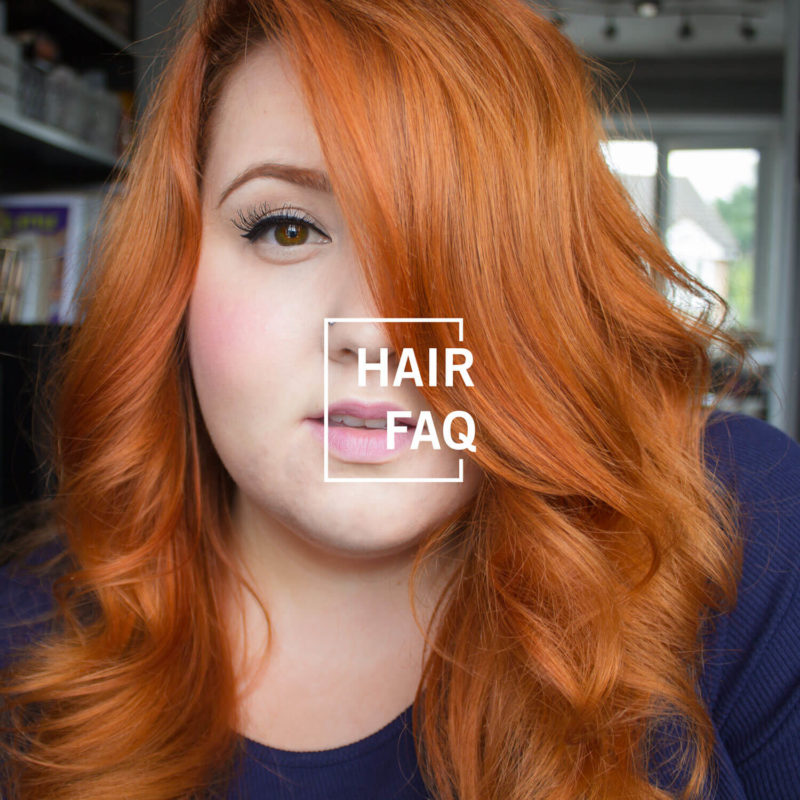
My hair is definitely one of my more stand out features – especially when I actually take the time to style it nicely. Now although red hair runs in my family, it unfortunately skipped me so I don’t have the honour of being a natural redhead.

I get a lot of questions about my hair and so that I can answer them properly, I’ve written this post for people who want to know more about how I get this colour and look. In truth, the colour was a happy accident so don’t consider this a guide… it’s more a loose re-telling with some hints and tips.

My Origin-ger Story

Orange hair was never the plan.

It was 2011, summer was approaching, and I had decided I wanted my hair to be caramel brown. I’d been dying my own hair since I was about 13 from boxes and at this point it was dark brown. I knew my only option to remove the build up of dye was bleach, but I knew it was risky. I was broke and couldn’t afford to get it done properly at a salon. Even if I could have, I probably would have attempted it myself first because I like messing with my hair! So I knew better, but I bleached it anyway. I can already see you nodding your head knowingly… guess what happened next!

Of course I ended up with a patchy mess that was orange at the ends and bright white near the roots. No biggie – just a rite of passage for the at home hair-experimentalist – but now I was in a pickle. All things considered, my hair was still in reasonable condition but the ends weren’t light enough for my caramel brown to take. I didn’t want to put it through another round of bleach so my options were:

1. Give it all up and go right back to dark brown
2. Attempt to balance out the colour by applying an auburn shade over the top, then figure it all out later

Well, you can guess which one I went for – option 2!
The shade I chose was Clairol Nice N’ Easy in Natural Light Auburn which is still available!

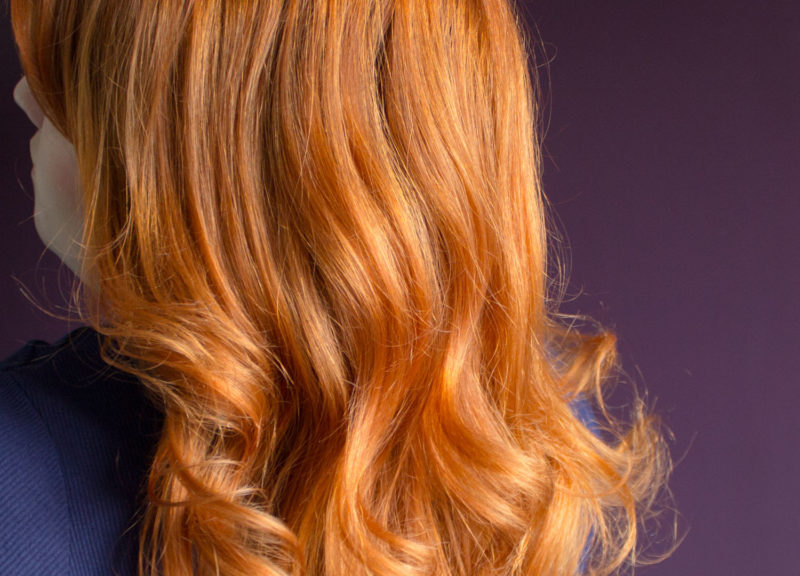
Over the years, I opted for increasingly outlandish shades of orange and this is where I’m at now.

My Hair Dye

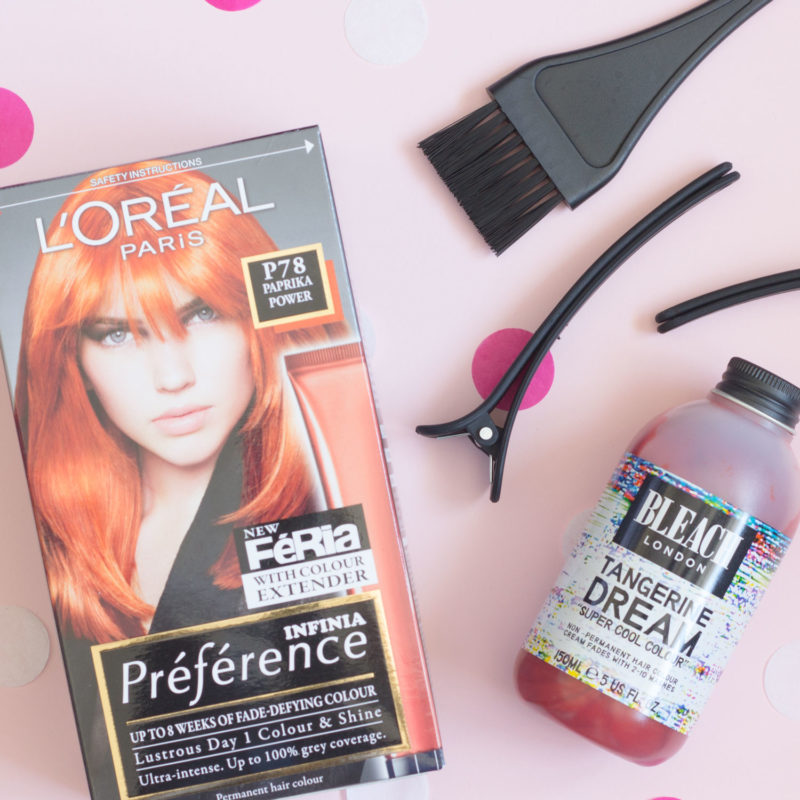
The shade I use is L’Oreal Paris Preference Infinia Paprika Power (P78). There’s no other way to describe it than ‘vibrant orange’! Sometimes I like to think it could pass for natural, but really I’m not fooling anyone.

I was using Mango Intense Copper (78), from the same range, for many years until L’Oreal cranked up the colour intensity with the release of Paprika Power.

Mango Intense Copper is a more natural hue of orange and people would often assume it was my natural shade. If you’re making your way up the orange scale, it’s worth using that one as a stepping stone.

Dye for Ginger Hair

The In Betweens

Red shades are notorious for fading quickly, so in between the ‘big’ dying sessions I sometimes give mine a helping hand with a semi-permanent dye to give it a colour infusion without causing any lasting damage. This is a recent addition to my routine, but being able to slap on a bit of extra colour in 20 minutes between dye jobs really brings my hair back to life when it’s lacking lustre.

I just apply Bleach London non-permanent dye in Tangerine Dream all over and leave it to develop for about 20 minutes.

Haircare Favourites

Tresemme Reverse Sysem

My haircare routine changes a lot but at the moment, I wash with Tresemme’s ‘Reverse System’ – a pre-wash conditioner and then a shampoo. I’ve definitely see a volume boost when I use these without any of the stickiness you so often get with volumising products.

John Frieda Nourishing Oil Elixir

No matter how often I get my hair trimmed, I always seem to have wispy ends so I use John Frieda Nourishing Oil Elixir applied sparingly to the lengths after drying/styling. It keeps my hair soft, tangle free and smoothes over any flyaways. This stuff lasts forever. I can’t even remember when I bought it, but it was a long while ago!

VO5 ‘Plump It Up’ Blow-dry Spray

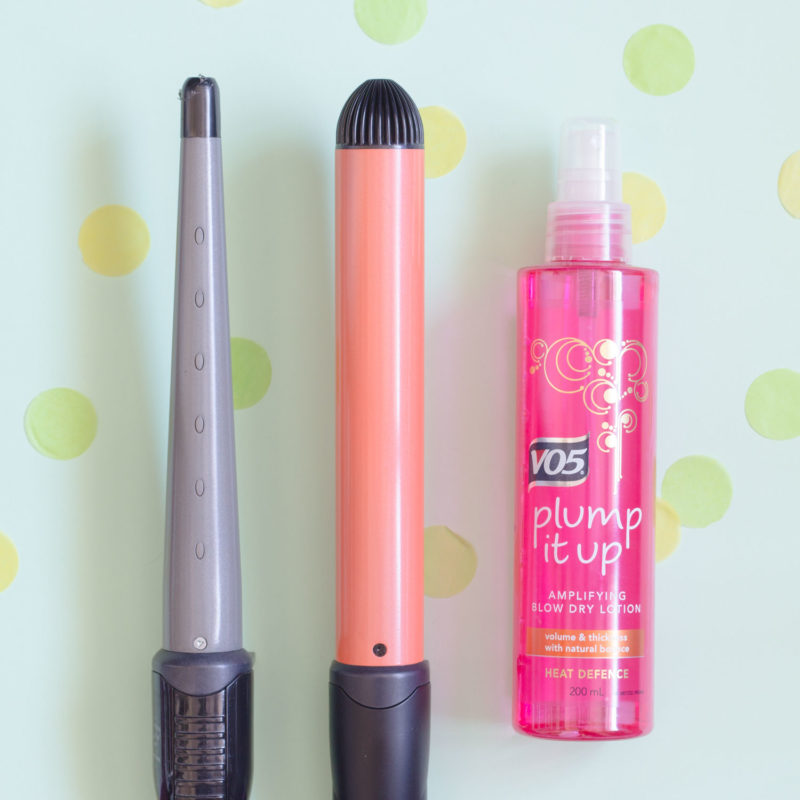
If I know I’m going to be styling my hair, I use VO5 ‘Plump It Up’ Blow-dry Spray ahead of time. I spritz a little in to my wet hair and brush it through before blow-drying. It adds volume and gives enough hold to keep loose curls in all day. Too much of it makes my hair feel sticky but I’ve found that happy place where I get just enough hold and it still moves naturally.

Olaplex No.3

Every 4-6 weeks, I treat myself to a round of Olaplex No.3. It’s the third step in a salon system designed for coloured hair but you don’t need to have used 1 & 2 to get a kick out of No. 3. It stands on its own to ‘repair the hair from within‘.

I apply it to damp, unwashed hair, cover with a shower cap for 1-2 hours, then wash my hair. It’s a pricey product but I’ll definitely be repurchasing. I can really tell the difference after a treatment – my hair feels revitalised and so much thicker. If you have coloured hair and feel like it could use a bit of extra energy, you should give it a try.

Hair Care Favourites

Styling

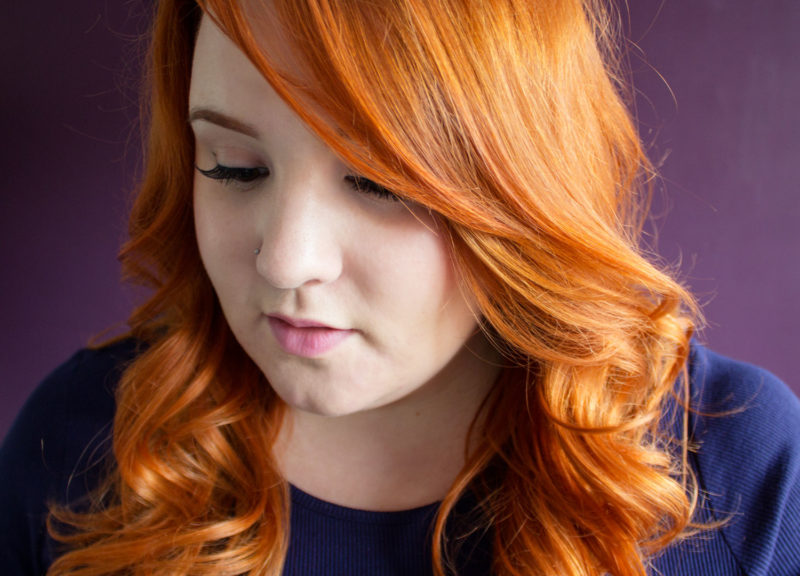
Most days I don’t bother styling my hair. It’s naturally somewhere between wavy and curly and most of the time, it dries frizz free and with a bit of movement in it. When I do style my hair, I always go for curls!

My favourite styling tools are the Babyliss Curling Wand and Tresemme Perfectly (un)Done wand. In the images from this post, I used the Tresemme wand. The Babyliss gives tighter curls but they hold a bit longer and can be brushed out to create lovely waves.

Wavy Hair Styling Tools

Hopefully that covers everything! Please leave a comment if you have any more questions and I’ll get right back to you.

China Glaze Happily Never After Collection Swatches and Nail Art


I feel like I’ve been waiting a long time to see a collection from a mainstream nail polish brand that doesn’t feature a red polish. So imagine my sigh of relief when the China Glaze Happily Never After collection dropped through my door… like a breath of fresh, autumn air.

The collection is out in time for Halloween and I’d happily rock most of them in a Halloween mani. The only exception is Queen, Please! which I think is a little too tame to hold its own as a Halloween mani and very sheer so I’d only use it as a topper anyway.

China Glaze Life's Grimm Swatch China Glaze Sin-derella Swatch

Life’s Grimm
This green-black with gold shimmer is a stunner and doubles as a great Christmas shade too.

Sin-derella
Sin-deralla is quite a unique shade. The base is kind of grey and there’s a strong pink shimmer which shifts with the light. You can see it in the nail art pics below as the base for my skull stamping.

China Glaze Queen Please Swatch China Glaze Do You, Boo! Swatch

Queen, Please!
This sheer pearly shade could be worn on it’s own but I think it would work best as a topper over a nude or pale shade of polish.

Do You, Boo!
A great glitter topper for Halloween manis. Quite densely packed with glitter but not quite enough for full coverage. The glitter in here is black and gold with a hint of holo in bars and hexes.

China Glaze Crown For Whatever Swatch China Glaze Lookin' Gore-geous Swatch

Crown for Whatever
Crown for Whatever is a Royal Purple with a Matte finish so, I’d say, the ultimate ghoulish polish. See it below with a glossy top coat.

Lookin’ Gore-Geous
I’m a sucker for a dark purple crème and the burgundy shade of this one is incredible.

Where to Buy Happily Never After

In the UK, you can buy the collection from Nail Polish Direct

For the Nail Art

I used Sin-derella and Crown for Whatever as my base colours and stamped on the skull design from MoYou Biker Collection 08 Plate in Black. Then I topped my ring finger with Do You, Boo!


3 Super Simple Christmas Nail Art Looks for Any Budget

It’s the most wonderful time of the year… if you like bad weather, busy roads and being forced to listen to Christmas music in every public space! I know I can be a bit of a scrooge, but I do love Christmas time really. Admittedly, highlights of the season for me are all the delicious cooked dinners, socially acceptable day drinking and of course… the Christmas nail art!

I’ve put together three looks that are perfect for any Christmas occasion. All three looks only use two shades of nail polish and basic nail art tools so they’re quick and easy to achieve on any budget.

Now you know I like to keep it classy so there’s nothing too flashy – although I have been spending a lot of time browsing through the crazy glitter collection at Ellisons so you will see a fair bit of the sparkly stuff. But that’s acceptable right? Glitter can totally still be classy when you do it right!

Glitter Candy Canes

Christmas Nail Art Candy Canes

All you need is…

A white creme and a dense red glitter.
I used… Barry M Cotton and Sally Hansen Cha Ching!

How to
1. Start by painting two coats of your base colour
2. Use a quick dry top coat and wait until it’s completely dry
3. Use strips of striping tape to mark off uniform stripes. Make sure the tape hangs over the edge of the nail.
4. Take a cosmetic sponge and apply your glitter nail polish generously to the surface. Dab this down on to the nail for maximum glitter transference! You can see the method in action on my YouTube channel
5. Immediately peel away the striping tape to reveal the white underneath
6. Top with your favourite top coat. The thicker the better to smooth it all over and get that perfect glossy surface

French Snowfall Dotticure

Christmas Nail Art Snowfall

All you need is…

A blue creme and a white creme
I used… Morgan Taylor Flirt in a Skating Skirt and Barry M White

How to
1. Paint on your base colour and wait for it to dry
2. Using a dotting tool, pick up the white polish and start dotting!
3. Start with a spread out selection of dots all over the nail, then focus in and fill it out towards the tip of your nail to create the falling snow effect.
4. Top it all with your top coat
TIP: Keep your dotting tool clean by regularly dipping it in to acetone and wiping away the mess on a cotton wool pad or lint free nail pad.

Fancy Festive Glitter Gradient

Glitter Gradient Christmas Nail Art

All you need is…

A soft creme for your base and a festive glitter
I used… Barry M Pink Lemonade and Cirque Helios

How to
1. Lay down your base coat and let it dry (you know the drill by now!)
2. Protect the skin around your nails using a ‘Mani Mask‘ type product or make your own. Things are gonna get messy!
3. Paint a little gold glitter onto the edge of a makeup sponge and lightly dab near your cuticles. Repeat this a few times and move upwards, always dabbing gently, to create the gradient effect.
4. Finish with your top coat and voila!

Tiger's Eye Nail Art Tutorial | No Gel & No Magnets!


My Google Alert for ‘nail art’ paid off nicely a little while ago when I saw an article about Katy Perry’s Tiger’s Eye nail art. Sure, it was on the Daily Fail but I couldn’t resist clicking to see the pretty! From what I gather, her nail tech created the looking using magnetic gel polish.

Now I love gel polish when the feeling’s right, but when it comes to nail art, I prefer working with regular nail polish – it’s just a medium that I’m more familiar with and if it turns out to be a complete fail it’s nice and easy to remove.

In case you’re not quite sure what I mean by Tiger’s Eye, it’s a gemstone that’s normally brown in colour with distinct iridescent stripes running through it which glint beautifully in the light. I wanted to create a similar look on my nails but with a little twist on the colour.

After a bit of trial and error, I came up with a technique which is not far off the way you would create regular gradient nails. It just requires a little more precision.

Check out the quick video below to see how it’s done!

Tiger Eye Nail Art Tutorial

Tiger Eye Nail Art Tutorial

Easy Tiger Eye Nail Art


All the Nail Subscription Boxes to Try in 2018 | The Nailasaurus

Subscriptions are the future! For me, a stereotypical millennial, it all started with Netflix and now I’m at the point where my razor blades are delivered through my postbox on a regular basis.

I think subscription boxes are so popular thanks to their Treat Yo’ Self factor and the simple truth that everyone loves surprise mail! There are subscriptions for everything these days and one that might be too tasty for any nail addict to turn down is one to a monthly box of nail goodies.

Here, I’ve rounded up some of the best in the biz with a good mix of price points and there’s something for you whether you’re more into your nail care, nail polish, or easy DIY nail art.

Scratch Monthly Mani Kit Subscription

Scratch (in collaboration with Nina Nailed It)

Scratch create easy to apply nail wraps which you can head to their website and buy whenever you fancy. But once a month, they release a limited edition set in collaboration with @NinaNailedIt – one very talented nail artist and one of my favourites to follow on Instagram!

Each Scratch Monthly Mani Kit includes one limited edition & exclusive to subscribers set of nail wraps (16 total) and some nail art extras which can range from studs and striping tape to nail files and glitter. Scratch reveal the wraps you’re going to get each month, but not the extras.

A set of wraps normally costs $8 so you’re paying an extra $2 for the nail art goodies and exclusivity of the specially designed wraps.

Availability: Worldwide
Frequency: Monthly
What You Get: Exclusive and limited edition set of nail wraps (8 wraps per sheet, 16 wraps total) designed by @NinaNailedIt plus handpicked nail art extras to accent your manicure!’
Price: $10 month + shipping

Subscribe to Scratch

Meebox Monthly Nail Subscription Box

Meebox

Meebox are a subscription box based in the UK. Their boxes are always centred around a theme and contain 3 nail polishes, nail art and nail care goodies. You always get your money’s worth!

They reveal the theme on the 1st of every month and you have until the 22nd to subscribe to receive that box. I’ve seen brands like NCLA, Leighton Denny and A-England in there. You get a real mix of indies, luxury brands and old school favourites. And they really think of everything – even including enough swatch sticks with every box for you to try all your new shades straight away.

Availability: UK
Frequency: Monthly
What You Get: 4+ nail products every month including nail polishes, tools and treatments
Price: £20 monthly or £54 upfront for 3 months (£18 per box.) Shipping included.

Subscribe to Meebox

Mani and Lola Luxury Nail Polish Subscription

Mani and Lola

Mani and Lola are a relative newcomer – their first box was in November 2017 – but already they’re changing the game. They’ve really nailed the luxury feel from the brands involved to the box itself. They call themselves a ‘monthly subscription that simplifies the manicure process and makes the UK’s leading nail polish brands affordable and accessible.’ and I have to agree.

The goodies are packed into a slide out box and wrapped neatly in tissue paper. The box is one you would probably be happy to keep around for storing your beauty products but unfortunately it’s a tiiiny bit too short to store some nail polishes in if you want to keep them stood up!

Availability: UK Only
Frequency: Monthly
What You Get: 5-6 products from a variety of premium nail polish brands. Their main focus is nail polish and the average RRP of the products inside any given box is £60.
Price: £20/month with discounts if you subscribe for longer upfront (as cheap as £14/month when you subscribe for 12 months.) Shipping included.

Subscribe to Mani and Lola

The Nailed It Box | Nail Art Subscription

The Nailed It Box

Another box that’s new to the game is The Nailed It Box. If you’re a budding nail artist, this might be the box for you. Each month you’re sent at least 4x nail art items which is perfect for anyone looking to build up their nail art collection but not sure where to start. In your first box, you get a stamper set so you’re ready for the stamping plates that come your way in future Nailed It Boxes.

Availability: Worldwide
Frequency: Monthly
What You Get: 3 sets of nail decals, a stamping plate (+ a stamper set if you’re a new subscriber), and 1-2 smaller nail art items or a nail art tool
Price: $11.95 + shipping

Subscribe to The Nailed It Box

Candy Coat

Availability: UK + Ireland only
Frequency: Monthly
What You Get: 3x Candy Coat Gel Polishes
Price: £15/month, Shipping included.

Subscribe to Candy Coat

Jamberry StyleBox

Availability: US, CAN, AU, NZ, UK
Frequency: Monthly
What You Get: 2x sets of nail wraps exclusive to subscribers (normally $15 each)
How much? $25/month. Shipping included.

Subscribe to Jamberry Stylebox

Do you subscribe to any beauty boxes? Did I miss out any nail subscriptions?